Saturday 27 February 2010

Modeling the desert scene

Modeling the desert scene was probably the most important yet most difficult to achieve. There was great controversy within the group how the the landscape should look as well as its feasibility during render time. I proposed that the scene itself be modeled exclusively in Zbrush as I would be able to produce more realistic and detailed results. Although the quality of the models would be superior to other programs the polygon count would be astronomical. We may have problems when it came to rendering the scenes.

I started off by modeling the sand terrain on a disc plain. I used desert images as reference so I could replicate realistic mountains and sand dunes using custom alpha channels I created. I created these alpha channels using photoshop images which I sourced from the internet.

Once I was happy with the basic form of the terrain I then started work on the rock layer which I created using a 3d disc which I inserted underneath the sand layer. By using the subtools option in zbrush I would be able to create separate objects which would be fundamental when it came to texturing. Rather than texturing one plain where I would have to match the texture to the various components, I would texture each component individually. This would make texturing much easier and the overall finish would be more precise.

I was very pleased with the level of detail as well as the the quantity of polygons I was able to work with. I created the scene using a sub division level of seven which should work in maya. It was difficult to get realistic mountains protruding from the sand layer in zbrush, however I persevered using an alpha channel I created which created rocky outcrops. My main worry when creating the scene was creating realistic rocks and mountains. If the mountains were smoothed the rocky effect would be lost.

I knew I couldn't exceed the sub division level of 7. This would cause maya to crash and rendering the scene would be impossible. I had to realize that there were certain rules the model had to abide by otherwise it would hamper memory and texture editing.

I imported both models into maya to be textured. I had no idea of the problems the high res model would cause. Initially the models appeared to be working in maya's interface. However, when it came to applying the textures and aligning the objects UV's this caused maya to quit unexpectedly. Either the textures I produced or the objects resolution were causing system failures. I needed to rethink my strategy to produce the best possible outcome within the constraints.

I tried to texture the scene within zbrush itself, however, this produced limited results where the texture would simply wrap around the object and seams were visible. The result was awful and would be jarring on the eye. The only solution available was to simply reduce the amount of polys in the scene. This would mean that high detail would be lost and mountains would appear more rounded. However, sacrifices had to be made in order to produce a working scene which would work in maya. I reduced the scene to a sub division level of 5. This would produce a scene which still included some detail without using up huge amounts of memory.

My strategy had worked and I was now able to texture the scene and align the UV's with relative ease. If I was to create an environment again i would either use software like vue which uses displacement maps exclusively which reduces memory while maintaing high end results. I need to find out how to use displacement maps in maya as well as bump maps. These procedures would give good results especially when creating rocky environments. Despite the problems I have created a working environment that works for the project which allows for animation and importing to take place.

Here are a few images which show the terrain from a zbrush model to a lower res textured image. I have also uploaded the textures which I created using photoshop.


The desert terrain

I painted a couple of images concerning the environment in which the mine and its various components would be located. I focused on lighting and composition as well as the design of the mine itself. The concepts were originally done in black and white to get a realistic ambient light. When I was happy with the result I would then add a colour filter which  would help us when it came to creating lighting and matt paintings.

I only got round to painting a colour filter on one of the concepts, however this gave us some valuable lighting and colour reference.

I was overwhelmed at the quality of the images and how they suggested mood as well as a futuristic but industrial world. I wanted the atmosphere to be dark and saturated with beams of light only just passing through the dense cloud cover. I think I have achieved this within the images I painted. However, incorporating this look within a 3d world would be a challenging and difficult issue. We may have to evaluate the look of the environment and its atmospheric conditions once we model the scene.


Friday 19 February 2010

Final Renders

Once I had finished the textures and decals I projected these onto the ship using planar mapping and transparent planes. I was thrilled when the desired effect had been achieved. I didn't think that the texture map would work. Hours of practicing paid off as I managed to fit the textures onto the model effectively. In some ares the texturing could be improved however, when the vehicle is lit this will help define the whole ship.

I tried to bump map the ship by using an existing texture. However, the result was undesirable and the ship appeared as though it had ripples all over the hull. I need to spend more time using the bump mapping tools to get the desired effect. But for now I am very happy with the result as it has fulfilled the groups expectations and my own. With the textures and decals now on the ship the whole model has now a realistic resonance about it. It not only feels realistic but also appears used and worn from the harsh conditions it works in.

Here are a few renders of the final build. 


Decals

I was pleased with the final outcome of the texture map I had created in Photoshop. I thought that the worn appearance of the metal befitted the story as well as the environment and its other components. The burn marks looked aesthetic and suggested the amount of energy needed to propel the ship through the air. The sheer scale of the object required engines that burned fuel constantly. The burn marks also suggest that fuel is not being burned efficiently but huge amounts of energy are being produced. The metal is rusty and worn with the constant battering of sand storms and the hostile atmospheric conditions. The group seemed to be very impressed with the texture, however more decals were needed to cover the ship. This would emphasize its commercial use. The Mining companies logo needed to be fitted onto the side of the ship. This would give the ship some identity and it would also suggest that the ship was owned by a very powerful organization.

I created some small decals which I would insert over the image using planes. I would then turn down their transparency. By doing this I could preserve the existing texture while at the same time ensure that the decal was the only image visible on the plane.


Texturing

I was very happy with the model I had produced, however, in order for the object to work in our environment the ship would need some sort of texture. I looked online for various textures which included metal plating from buildings, rusty doors, ship plating and many many more. I eventually settled on what appeared to be metal plating from a battle ship or an aircraft carrier. I felt the blue, grey tones as well as the rectangular plating would gel well with the model. The texture itself would give the ship a used quality to it, which would suggest it had been used for a very long period of time. 

Before I customized the texture I began to familiarize myself with the texturing tools and interfaces in order for the material to be placed correctly on the object. I noticed that when I applied the material straight onto the object it appeared warped and distorted. This was because I had not aligned the UV's correctly in accordance with the texture plane. I needed to create a UV planar and match it with the surface I wanted the material to be applied. This took a few attempts to get right, but once I knew how the planar interface worked I could match the texture map with my model. The result was rudimentary but gave more than adequate results.
In order for the texture map to work I needed to add more detail and increase its size to mach the model. I had difficulties in applying the textures as many of them were distorted. However, once I was familiar with the tools I managed to fit the texture to the model. 

Now I was confident I could texture effectively I set about tweaking the existing texture I had by adjusting its size and shape as well as its hue and saturation. I did all this in Photoshop. I had to manipulate the texture and multiply several layers to mach the existing texture. I was careful to maintain a constancy regarding the plating but added burn marks and imperfections where the metal had been worn.


Occlusion

Once I had finished the modeling of the ship I then set about rendering the object with an occlusion to see how light would react with the surfaces. These renders would also help me identify any areas which I felt needed work adding to.


Finer details

Once i had finished the main bulk of the ship I proceeded to model the finer details of the model which would cover up the flat edges and surfaces which I was not happy with, but were fundamental to the ship's foundations. I built many cylinders and spheres to create the details under the fuselage which would create the drop tanks and radar equipment which would make the ship more aesthetic. By adding these finer details it would make the ship appear more chaotic, I was trying to replicate the haphazard technology that is reminiscent of present day aircraft. If you look under the fuselage of modern aircraft there are all sorts of cylindrical objects and equipment, this is what I was trying to achieve. By adding a vast amount of pylons and radar equipment I was hoping to achieve the same effect as the Sullaco in Aliens. These cylindrical elements were easy to build and could be duplicated many times as well as distorted to create some very cool details.

I was extremely happy with the final result as the model resembled some of my earlier drawings. The ship maintained a consistency with the other models in the environment. At this stage I was imagining how these huge behemoths would travel through the sky's looming high above the planets surface. The overall object is very domineering, because of its huge size and resembles an airborne oil tanker. This is the effect I wanted to achieve from the very beginning and was very pleased with the result.

Now the ship needed a realistic texture that would resemble metal plating, only then would the model be a true success. 


Exterior tail fins

I deleted the fins either side of the engines as they seemed to big to be supported by the engines themselves. In order for this to work I would need to model some supports or horizontal fins to support the fins. A this point I was not sure what form the supports would take and I had no idea how to model a convincing fin shape. After looking at the Mohawk as well as the lancaster bomber in my reference material I gained some valuable knowledge in terms of design and weight. I created one horizontal fin which would be situated under the hull of the ship. I was careful to model it in a way that would be aerodynamic. The front of the wing would be thicker than the back of the wing. This would give the airship some realism. I then proceeded to make the exterior wings which I duplicated many times. These would form the smaller fins and wings which would form the finer details of the craft. The ship itself was taking shape. I loved the silhouette which resembled something much like an angle fish. This is what I was aiming for and it was exciting to see one drawings becoming a reality. 


Upper fin Lower fin

I was very happy with the basic shape I had created so far. I now needed to extrude surfaces to increase the overall bulk of the ship. I also started work on the upper fin by moving vertices together which created a narrowing of the fin which made the object more aerodynamic. I started to model the after burners at the back of the craft. I was very excited with the front of the aircraft as I had modeled a recess in which the cockpit would sit. The polygons at the front of the ship created a shield which protected the cockpit from the harsh weather on the planet.

I was not happy with the way in which the lower fins had turned out. The wings looked as if they were hanging on by a thread and there was no way a huge object like that would be supported from the engines. I needed to rethink this.

Modeling the airship

Once the group was happy with the design of the airship I started modeling the basic shape in maya from a basic cube which I then subdivided to allow me to extrude the shape and move vertices to build up a pyramid. I used the reference that was available to me when constructing the model. I was always referring to present day aircraft as well as my silhouettes and final concepts. At this stage I wanted to construct the foundations of the aircraft and concentrated on making the upper fin of the aircraft. I only made one side of the fin as I knew I could mirror it which would save modeling time. I am glad I didn't get bogged down making the finer details at this stage as this would have severely distracted me from constructing the main bulk of the ship that was imperative to the ships success.

Land Vehicle designs

Once i had designed the air ship I began to draw up simple silhouettes for the armoured vehicle that also transported the Intronium to a remote location. I was careful to maintain a style consistency. I designed the land vehicle much like the airship. It maintained the pyramid shape reminiscent to the mine and the air based vehicles. I was also weary of present day technology and incorporated some realistic elements which helped keep a realistic feel to the vehicle.

I started by drawing up some simple shapes which gave me a good platform in which to construct the vehicle which Chris would model. Once the group had selected the vehicle that best represented the story I began to work on a much more detailed image which Chris would use as a template for constructing the armoured vehicle in Maya.

I was very pleased with the final outcome as the design was in keeping with the other models in the environment. It conveyed the role would carry out within the environment. The whole design worked in a functional and a design sense. I especially liked the way the caterpillar tracks turned out. These would be fundamental in the sandy conditions. I also included a pin-up on the side of the vehicle near the cockpit. This gave the vehicle a sense of realism and suggested that humans controlled the immediate environment.


Ship Designs

Using the reference I had gathered of various aircraft I started to draw up simple silhouettes in photoshop to get an idea of the crafts basic shape. At this early stage I didn't want to get bogged down with detail and just started to scribble some shapes. I was careful to reference the material I had gathered as I wanted the ship to look like it had been built by humans whilst still maintaining a futuristic look. Here are a few early designs I came up with using Photshop.

I was very pleased with the initial concepts that I had produced. This now gave me some good foundations to work from. I knew the shape I wanted but the details needed working on. The upper half of the ship itself would be clad in some sort of metal plating. The lower half would be strewn with mechanical bits and pieces as well as various fins and wings. These would be coloured and textured in such a way that would suggest that it had been used for a very long time. I also wanted to include burn marks where the engines had blasted the exterior. I was slightly concerned, at least at the beginning, how I was going to build the details on the underside of the craft. The concept was detailed, but the shape itself should be easy to build in maya.

I suppose the only thing I was worried about was finding textures for the ship that would bring out details on the upper surface of the ship. Modeling the ship looked daunting ,however, I was confident that I would produce something that looked like the concepts I had designed.

I was pleased with the final concept which i drew up for the airship, however looking at it more closely i began to realize that the ship looked a bit too alien. I loved the metal decal and the overall shape of the craft, however, when modeling the ship in maya I would have to include some features of modern aircraft which would suggest this ship was made by humans and not some extra terrestrial species. The models we were building had to have a similar style, otherwise it would seem like the objects had been built in different time frames and would be jarring to the eye.

When designing the ship I took into consideration all the aspects of our environment and how it would relate to the mine. By giving the ship this pyramid appearance it maintained a consistency with the designs of the mine and the armoured land based vehicle. The ship design also resembled the shape of the IPMC logo which Chris designed. 


Saturday 6 February 2010

Ground Vehicles

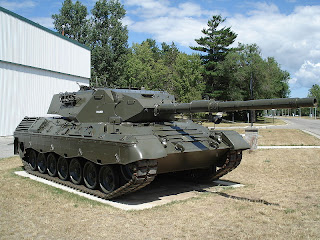
Here is a selection of ground vehicles that helped me design the transport vehicle for the mine. Like the air vehicles I wanted the ground transportation vehicles to look like they were maintained and built by a military force of some kind. in order for the vehicle to work i had to combine present day tanks with present day mining machinery. The images would also prove useful when modeling and texturing the final vehicle.